 |
Beast style hunting requires the hunter to be great at reading topographic maps and have an uncanny ability to put themselves where they need to be, at the right time, to have success. This may mean scouring maps for hours, watching weather forecasts like a hawk, hiking miles through a swamp, and doing things that others may think are crazy to be successful. Dan Infalt, the creator of the Hunting Beast, is great at explaining his advanced deer hunting tactics. His teachings have increased my deer hunting game tenfold. I hope to do the same for you with understanding the "Beastlike" methods that I use to find and catch wild trout.
 |
| One of my favorite captures of a winter time blue line stream. |
I often spend hours looking at topographic maps, googling stream names, looking at biologist reports, and surveying small streams. Sometimes these efforts pay off with a stream of blue line glory, other times I may hike in a mile or so only to find a tiny trickle with no canopy. These great lengths of effort are why so many anglers who are successful at catching wild trout, are also so secretive about their spots. I will not be posting any specific stream names in this article, but I will be showing you how to up your game to find wild trout and the places they live like the ones you will see in the pictures of this article.
 |
| A stunning winter native brook trout that chose a small streamer. |
 |
| A picture of my car parked surveying a stream. |
Much like "Beast Style Hunting" you can use similar game plans to broaden your area of coverage. In my opinion four hours spent spot checking different streams is better than spending four hours on a single stream and not catching a fish. It is always good to have a large number of streams on your list. This will come in handy if your first stream, or fist few streams are blown out from rainfall or froze over. Think of these as back up plans. With hunting I won't go near a spot if the wind is wrong. With blue lining you get a little more leeway with the intelligence of a native brook trout compared to the nose of a whitetail deer, but you can understand that hitting areas when the conditions are right will increase the amount of fish you catch.
 |
| A fine specimen of a native brook trout still showing fall spawning colors. |
Stream surveying is not as exciting as the next methods I will be discussing, but is not a method that I would skip by any means. It is down right effective. Remember to keep in mind what I said about scouting. You are really only look for one or two fish on these surveys. If you take good notes, you can really set yourself up for great trips in the future.

The next section of this article will cover how to read topographic maps and how to use them in blue line fly fishing. The image below is of an prospective area that I am currently doing recon on for the spring of this year. This section of mountains is within fifteen miles of my new camp I purchased last year. This will be a good example as it has many talking points I can discuss with you. So get ready as this will be a pretty lengthy process.
(NOTE: I blacked out any identifiable labels from this map. I am interested in helping you become a blue line angler, but will not be risking any of the spots I have been researching in the process.)
First, let's learn how to understand what the topographic map is trying to show us. Topo mops can give a perception of a 3D image on a 2D surface like a map or computer screen. A topographic map is used to show the features of the land by the use of contour lines. Contour lines are the brown lines shown on the map. These lines are used to show changes in elevation. A basic rule is that the closer the contour lines are, the steeper the grade. The farther the contour lines are apart the flatter the grade. This concept is a very important one to understand. I feel that reading a topo map is one of the most important aspects of blue line angling. There is a wealth of information out there on reading and understanding topographic maps so I only wanted to give you the basic concepts. It will be worth your while to expand your knowledge on reading and understanding this maps, but I just wanted to give you enough background to comprehend this article.
 |
| Example of a stream on a topographic map. |
Let's dive into the screen shot of the map above. I want you to think of a blue line stream as an outline. The lowest section of a stream will typically be the widest section. In terms of lowest, I am speaking of lowest elevation. This will also mean that this area will have the widest spacing of contour lines. This area is typically where the stream will be most flat in elevation as well. With every stream that flows into the larger stream, the larger stream will, more often than not, grow in size. This can be width of stream, or depth. Typically there will be a pool where this confluence happens as well. Be sure to spend a little extra time at this pool on your fishing ventures.
If you look at the bottom center of the map above you can see that this is the "MAIN BRANCH" of the stream. Consider this the main topic of your outline. As we move up we can see that there are two "forks" that come together to form the main branch. For reference let's just call these LEFT BRANCH and RIGHT BRANCH. So in terms of an outline this stream will look like this:
A. MAIN BRANCH
1. LEFT BRANCH
2. RIGHT BRANCH
For the rest of this demonstration we will refer to these streams as mentioned in the above outline. Lets focus on the LEFT BRANCH now. As we follow the branch up we can see there is one other blue line that flows into the LEFT BRANCH for the section of stream we have selected. So now our outline would look like this:
A. MAIN BRANCH
1. LEFT BRANCH
a. Tributary 1L
2. RIGHT BRANCH
Now let's look into the Right Branch. As we move up from the fork of the RIGHT BRANCH we can see that there are three blue lines that flow into the RIGHT BRANCH for the section of stream we have selected. Our outline now would look like this:
A. MAIN BRANCH
1. LEFT BRANCH
a. Tributary 1L
2. RIGHT BRANCH
a. Tributary 1R
b.Tributary 2R
c.Tributary 3R
So, why break streams down like this? Once you get good at recognizing streams on a map you will not have to do this at all. I am just using this as an easy way to learn how to identify these characteristics. These are all things that I now do mentally, but it wouldn't hurt to make a small outline such as this in your notes to keep information at hand.

Now we are going to dive deeper into what the lines on the map are showing us. When looking at these branches and streams we notice that they have "V" Shaped contour lines. These "V shaped lines are what gives us our mental preview of the stream. The LEFT BRANCH shows a tighter distance between the legs of the V compared to the RIGHT BRANCH. This lets me know that the LEFT BRANCH will have a steeper grade to it than the RIGHT BRANCH. When we look at the contour lines of the mountains the stream is running through on the LEFT BRANCH we can see that it has very steep terrain on the right side of that stream. Also in the upper section of the LEFT BRANCH we can see that it flattens out.

Now we are going to dive deeper into what the lines on the map are showing us. When looking at these branches and streams we notice that they have "V" Shaped contour lines. These "V shaped lines are what gives us our mental preview of the stream. The LEFT BRANCH shows a tighter distance between the legs of the V compared to the RIGHT BRANCH. This lets me know that the LEFT BRANCH will have a steeper grade to it than the RIGHT BRANCH. When we look at the contour lines of the mountains the stream is running through on the LEFT BRANCH we can see that it has very steep terrain on the right side of that stream. Also in the upper section of the LEFT BRANCH we can see that it flattens out.
The mental image of the LEFT BRANCH I am getting would be a faster moving stream nestled in the bottom of a pretty steep hollow. The upper end being flat leads me to believe that there is not a lot of water volume in this stream. Tributary 1L of the LEFT BRANCH is looking more like a spring. I don't imagine there is much volume hitting the LEFT BRANCH from this stream.
Now that we have our mental image of the LEFT BRANCH figured out lets examine the RIGHT BRANCH. Looking at the "V's" of the RIGHT BRANCH we can see they are decently spaced. This lets us know that the stream does not have a very steep grade. The fact that it has three tributaries feeding it leads me to believe that the RIGHT BRANCH has more volume than the LEFT BRANCH. The RIGHT BRANCH also has a wider distance between the bottom of the mountains that the LEFT BRANCH. This lets me know that the stream has more water capacity potential than the right branch. I would imagine that over the millions of years of annual spring high water levels that the RIGHT BRANCH has eroded some of the mountains on each side away. The wider space between the surrounding mountains and greater distance between the "V's" also leads me to believe that this stream will be much easier to navigate than the LEFT BRANCH.
My mental image of the RIGHT BRANCH is a decently wide stream with more flow than the LEFT BRANCH. It will be much easier to navigate than the LEFT BRANCH. It won't be as fast as the LEFT BRANCH because of the gradual grade that it flows.
Now that we have our mental images of each stream, what else can the map tell us? Looking at the map again we see a red and white dashed symbol that snakes its way up through the mountains. This is a road. If we look at the LEFT BRANCH we can see that if flows right along the road. This leads me to believe that the LEFT BRANCH would see more angling pressure than the RIGHT BRANCH. This also would mean that I could get in and out of the LEFT BRANCH easier as well if I was short on fishing time. I could really get off of the beaten path if I fish the RIGHT BRANCH. The clues in how far the stream is away from the nearest road may lead you to unpressured fish and banner days on the water.
 |
| Reference of a similar stream to what I feel the RIGHT BRANCH would be like |
 |
| A reference picture of what I feel the LEFT BRANCH would look like |
 |
| A few of the flies I use when fishing streams I feel would have faster water with deep plunge pools. |
The mapping scenario above is a real scenario as I have never set foot on either of these streams. When I do, I will upload a follow up and show if my hypothesis's were correct. The aspect of the unknown and seeing how close I can get with my hypothesis is one of my favorite parts of blue lining to be honest. I love seeing and catching beautiful wild trout, don't get me wrong, but nailing a breakdown of a stream and catching these trout just adds to the adventure.
 |
| An example of a map showing the features of a stream. Here we see some brush piles and a beaver dam that is adjacent to the stream. |
Now I will take you to the next technique that I use when finding blue lines. Satellite maps are not as important as topographic maps for my fishing style, but these maps will give you different clues about the stream you are prospecting to add to your hypothesis. You can get a good idea of the vegetation and canopies you will encounter on the stream. These satellite maps may also clue you in on some of the structures that you may wade upon. Now, the majority of the blue lines I fish are completely covered by a canopy, but some streams you can see different features such as pools on sharp bends of the stream. You can locate brush piles, pocket water sections, and other structures as well. You can also find homes and other dwellings that are located along the stream to ask for permission if the stream runs through properties that are not public ground.
 |
| An example of a satellite map showing a green forest surrounding a stream. |
First, let's look at the vegetation on a satellite map. When you zoom in on a satellite map, look for dark green areas along the stream. These may indicate that the stream may have some coniferous trees like hemlocks or other thick canopy vegetation like rhododendron and mountain laurel. This will let you know that the shade of this type of canopy should help keep the stream cold in the summer. Also, this may let you know that you may need to take a shorter fly rod with you to combat the short canopy. I don't have many issues casting on tighter canopy streams with a longer fly rod but the issue resides in landing the fish. I am using barbless hooks 100 percent of the time. When you hook a native brook trout they wiggle so much that you can't have your rod tip stuck in the canopy and expect to land a fish. Even with a net, you will lose so many fish by taking too long of rod on these tight canopy streams. There are many advantages to using a longer rod if the canopy allows it however. You can stand back from the fish at a longer distance and reduce the risk of spooking the trout. The length of rod I take is entirely dictated by the stream canopy.
On the flip side of the vegetation spectrum, you can also see clear cuts and logged areas that may not be visible on the topographic map. It only takes one or two trips to a prospective blue line stream that ends up being in the middle of a clear cut, to learn to double check your topographic hunch with a satellite map. Ripped waders and rough traveling conditions are not fun nor efficient in your adventures. You may also see that the upper and lower end of a blue line may have a dense canopy, but the lower end may have a clear cut going right trough the middle. This would lead me to believe that the middle section of that stream will warm up and may not have many trout in the lower section. This may mean that the stream may have a greater population of brook trout above the clear cut, and more wild brown trout below. Be mindful of the canopy or lack there of when examining satellite maps.
Looking for bends and deep pools may not be easy on smaller blue lines, but on streams with a little more width to them this can be a huge advantage. If you cyber scout the stream and see a few things like that on the map you can pin these locations. You may even see a beaver dam or an old man made dam of some sort. Small areas such as these can give you hope if you are not picking up any fish on a stream, and also give you a key focal point if you are spot checking. You can examine what different bridges look like, and can pin point potential parking areas as well.
 |
| A rather large brown trout in comparison to the blue line stream the fish resided in. |
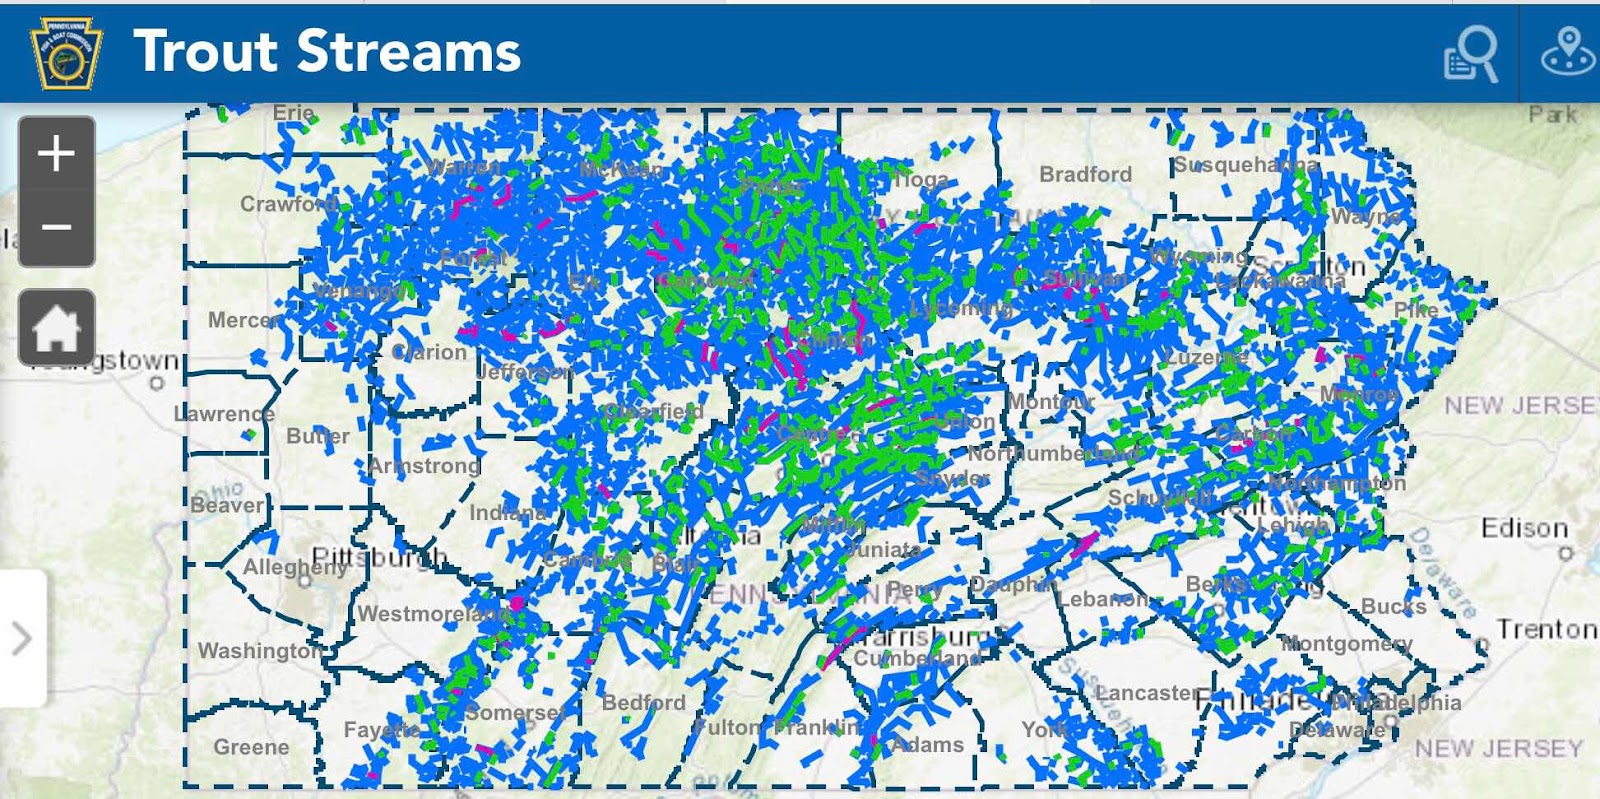 |
| An interactive map provided by the PA Fish and Boat Commission. |
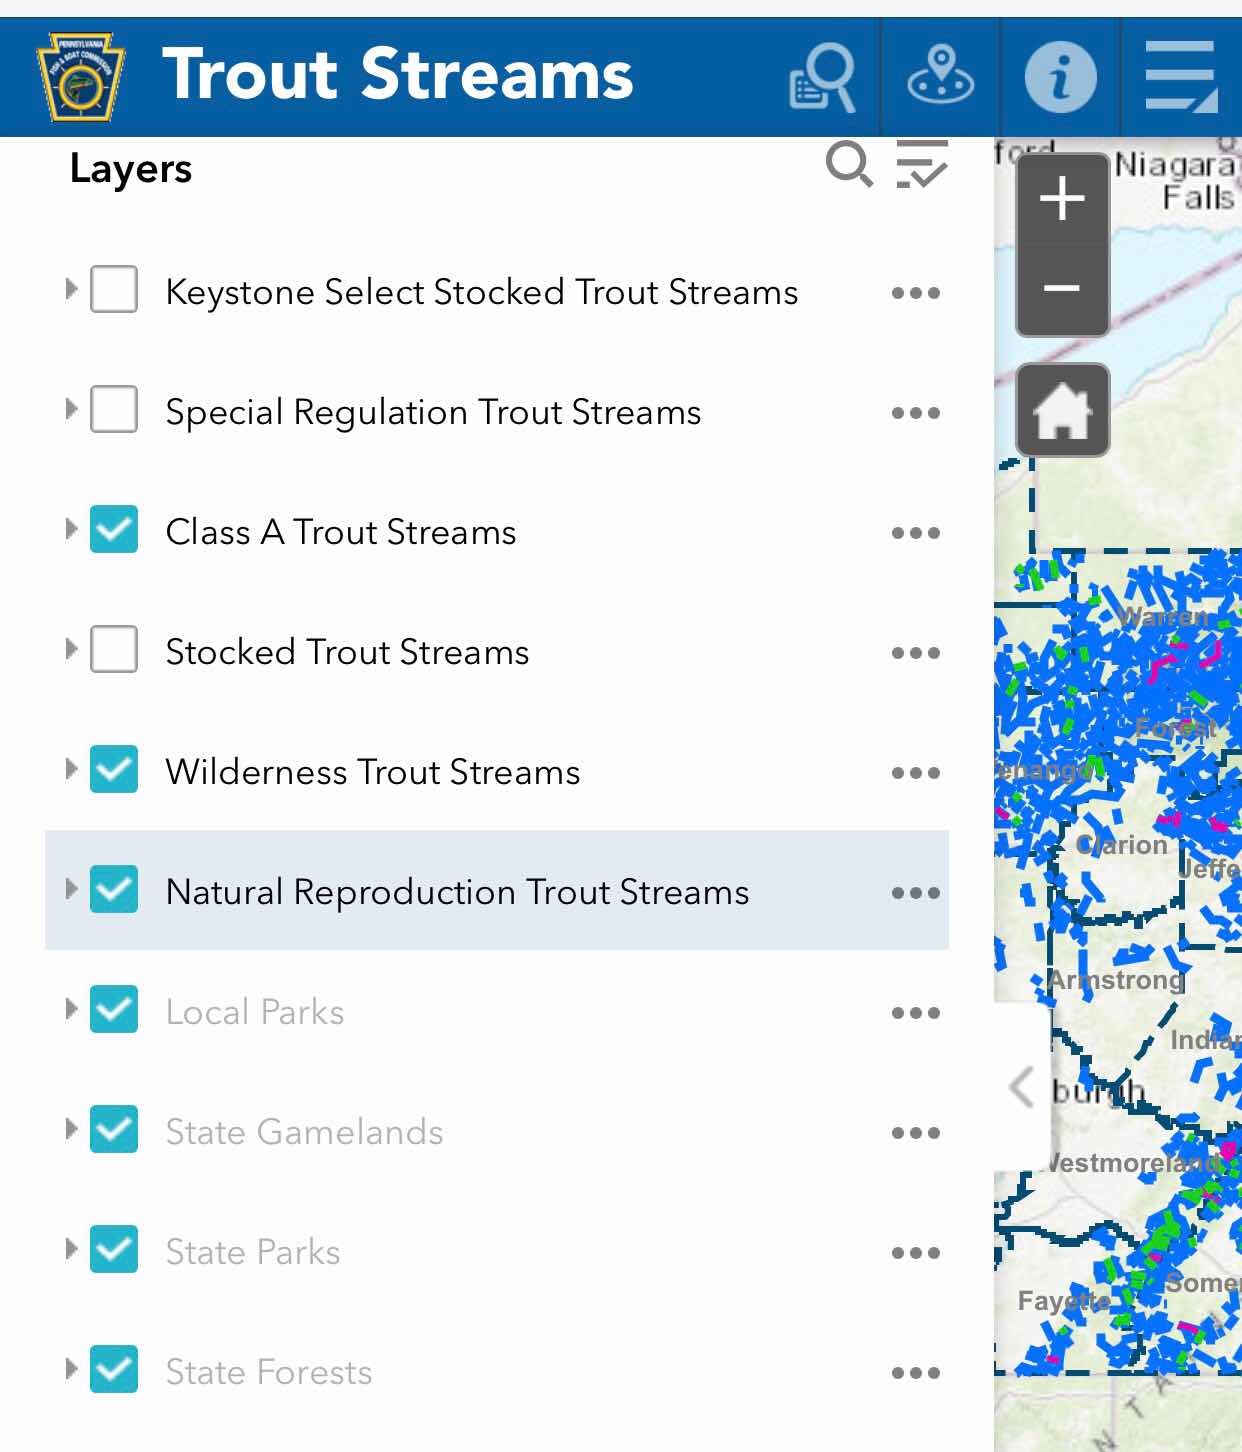 |
| The boxes I check in the dialog box of the PA Trout Streams Map. |
These are the boxes I check in the dialog box that pops up when you first open the map. I select these boxes when I wan't to chase wild trout. The other choices can help you find stocked streams as well as fly fishing only or delayed harvest artificial lures only areas. I like to leave the public access areas highlighted to help with access searching. I mostly select Class A Trout Streams, Wilderness Trout Streams, and Natural Reproduction Trout Streams. These check boxes will give you a huge number of waters to explore in Pennsylvania. I prefer to utilize the Natural Reproduction Trout Streams and Wilderness Trout Streams boxes the most. These streams seem to see the least amount of pressure and are most fun to explore. They require a bit more digging and researching to find access and often have not had any biologist reports conducted on them. Do to the uncertainty of success, these streams do not receive a lot of pressure. The Class A Streams selection means that the stream has been surveyed and the biomass of wild trout found in the stream is high enough to get the highest Class A rating. This often means more fish, but also means more pressure. I will not go into further detail on these maps and want you to spend time on your own learning how to use them. Put in some effort to learn all of the features of these maps.
I mainly use these maps last as I feel they take away a lot of the unknown about a putting in reconnaissance work on a stream. This sounds counter productive but I enjoy the struggle. If I am out surveying streams for wild trout, and feel I should have caught fish but don't, I refer to this map to see if the stream has been surveyed and if it has natural reproducing trout in it. If I don't catch any, and it is not on this interactive map, I then put it lower on my list of prospects. I will eventually go back to this stream at some point to explore, but will hit more productive streams first.
The addition of this interactive map has really shown more pressure to the wild trout streams that I fish especially once the stocked trout waters are shut down. I want to take a brief detour in this article from finding wild trout to discuss proper wading and fish handling techniques if you decide to give blue lining a try. Us "Beastlike Blue Liners" really love these fish. We know that once the stocked waters close many anglers, excited about the Opening Day of Trout in Pennsylvania, may seek open waters to scratch the itch just before season. I wanted to cover these aspects in this article as I feel that it is extremely important to conserve the resource and educate anglers that may not know about the topics I am about to cover.
When fishing these blue line streams, especially from October to March and early April, the angler must pay special attention to their wading practices. If at all possible I try to totally avoid wading in the stream. It is often discussed to not fish over trout that are spawning, but in my opinion it is even more important to avoid trampling over redds. A redd is the spawning bed produced by wild trout during the spawning period. Wild trout spawn in areas with loose gravel. The female fish will clear out the gravel, deposit eggs while the male fertilizes them, then cover the eggs up with more loose gravel. Fresh redds are easy to find as they are often discolored from the rest of the stream bed. By the time the stocked trout waters close redds are not as easily identifiable. Silt and sediment has covered the gravel that was dispersed over the eggs at spawning.
When you wade these types of streams it is best to not step foot in the stream if at all possible. If you must cross the stream, do so in faster water areas that are comprised of mostly larger rocks or silty/muddy areas. These areas are not suitable areas for redds. Try to step from large rock to large rock to avoid stepping on any unforeseen redds. The issue is that the fertilized eggs that are buried beneath the gravel are growing into fry. These fry will not hatch from the egg until late March and April, or until the water has reached the optimum temperature for the wild trout to hatch. Most often these fry emerge just as the first hatches are coming off of the stream. It is important to wade carefully any time of the year but is vitally important from October to late March and early April. If an uneducated angler tramples up a stream on top of redds, this can spell disaster for the wild trout population for years to come. We must pay attention to these things if we are to protect the resource.
Proper fish handling is also another aspect that I feel needed to be discussed in this article. Barbless hooks are must for wild trout. We want to reduce the chance of injuring these fish if they take a fly too deep into their mouth. Try your best to always have a net with you. Nets are great as you can easily keep the fish in the water, and also reduce the risk of dropping a fish onto the ground. ALWAYS wet your hands before touching a fish. The oils of your hands can really damage the skin of the fish. If you are taking a photo of a fish, keep the fish in the water until the moment you are ready to push the capture button on your camera or phone. I wanted to conclude this article with these topics as keeping these fish safe and healthy should be your number one priority when blue lining.
I hope this article has you excited to give blue line angling a try. I wanted to teach you some of the steps that I use and encourage you to get off the beaten path and explore our wild trout waters. The sights you see and fish you catch are breathtaking. You will be surprised at some of the places you will discover these fish. You may find a stream that is full of wild trout that you've drove past thousands of time and never once thought that trout would be present. I feel that this article gave you just enough information to build your foundation but left a lot for you to learn on your own as well. The main thing that I want you to take away from this article is to not be afraid to risk failure to get a reward. You will have days without catching a fish. You will have days where you want to give up and just chase stocked trout, but I promise you that if you explore long enough you will find your blue line glory.
 |
| My personal best native brook trout. |
The addition of this interactive map has really shown more pressure to the wild trout streams that I fish especially once the stocked trout waters are shut down. I want to take a brief detour in this article from finding wild trout to discuss proper wading and fish handling techniques if you decide to give blue lining a try. Us "Beastlike Blue Liners" really love these fish. We know that once the stocked waters close many anglers, excited about the Opening Day of Trout in Pennsylvania, may seek open waters to scratch the itch just before season. I wanted to cover these aspects in this article as I feel that it is extremely important to conserve the resource and educate anglers that may not know about the topics I am about to cover.
 |
| A beautiful winter wild brown trout held with wet hands, and gently resting on my wet wading jacket. |
When you wade these types of streams it is best to not step foot in the stream if at all possible. If you must cross the stream, do so in faster water areas that are comprised of mostly larger rocks or silty/muddy areas. These areas are not suitable areas for redds. Try to step from large rock to large rock to avoid stepping on any unforeseen redds. The issue is that the fertilized eggs that are buried beneath the gravel are growing into fry. These fry will not hatch from the egg until late March and April, or until the water has reached the optimum temperature for the wild trout to hatch. Most often these fry emerge just as the first hatches are coming off of the stream. It is important to wade carefully any time of the year but is vitally important from October to late March and early April. If an uneducated angler tramples up a stream on top of redds, this can spell disaster for the wild trout population for years to come. We must pay attention to these things if we are to protect the resource.
 |
| My 2019 "Brookie of the Year" held in the water for a photo. |
 |
| A photo I captured of Joel and Nate of the Allegheny Native YouTube Channel |
Great article and good advice on all accounts. If I fish in my District and catch nothing, the stream is further investigated to see what may help to return it to productive waters. Sometimes it is acid deposition, siltation from land users upstream or reduced canopy causing high summer temperatures. A pH probe, a quick macroinvertebrate check and baitfish types usually tell the story well.
ReplyDeleteDude. You are the trout master. This article is so informative. I appreciate your passion and willingness to share. I don’t mind one bit that you don’t tell the names of the streams. Your reasoning is spot on.
ReplyDeleteGreat article! You should do more!
ReplyDelete